

搜索到
384
篇与
moonjerx
的结果
-
 uniAPP 如何不让输入框不失去焦点( 阻止点击默认事件) 场景:输入框与发送按钮是兄弟关系。输入框获取焦点时会唤起键盘,点击发送的输入框会失去焦点。要求:点击发送按钮时,输入框不能失去焦点,键盘一直呈现唤出状态分析: 当我们点击某一个元素时,这个元素就会默认获取焦点,在上述场景中,输入框在获取焦点时会唤出键盘,但是由于发送按钮与输入框不是同一个dom元素,所以点击发送按钮时输入框就会失去焦点,发送按钮就会回去焦点,键盘就是收起。 如果阻止点击dom元素的默认获得焦点这个事情,那么上一个获取焦点的dom元素就不会失去焦点。也就是输入框不会失去焦点,键盘就不会收起操作:发送按钮的事件用 @touchend.prevent=""touchend(触屏事件)prevent(阻止默认事件)例子:<view class="send" :class="sendMsgClass" @touchend.prevent="sendText"> <view class="btn">发送</view> </view>
 -
IOS安全内边距safe-area-inset-bottom IOS全面屏底部有小黑线,存在安全距离。位于底部的元素会被黑线阻挡,可以使用以下样式: padding-bottom: constant(safe-area-inset-bottom); /* 兼容 iOS < 11.2 */ padding-bottom: env(safe-area-inset-bottom); /* 兼容 iOS >= 11.2 */获取高度时,可用: height: calc(100% - constant(safe-area-inset-bottom)); height: calc(100% - env(safe-area-inset-bottom));{callout color="red"}tips:先使用constant 再使用 env{/callout}自定义顶部导航栏顶部存在状态栏,也就是显示信号、时间等信息的状态栏padding-top: var(--status-bar-height);{callout color="#ef4d4d"} 可以在页面的最外层的盒子加内上边距 padding-top: var(–status-bar-height) 避免顶部导航栏与状态栏重叠;并且需要给最外层盒子设置背景色与页面背景色一致,不然会出现状态栏的背景色和页面背景色不一致的情况{/callout}uniapp css变量uniapp css变量 注意:var(--status-bar-height) 此变量在微信小程序环境为固定 25px,在 App 里为手机实际状态栏高度。当设置 "navigationStyle":"custom" 取消原生导航栏后,由于窗体为沉浸式,占据了状态栏位置。此时可以使用一个高度为 var(--status-bar-height) 的 view 放在页面顶部,避免页面内容出现在状态栏。由于在 H5 端,不存在原生导航栏和 tabbar,也是前端 div 模拟。如果设置了一个固定位置的居底 view,在小程序和 App 端是在 tabbar 上方,但在 H5 端会与 tabbar 重叠。此时可使用--window-bottom,不管在哪个端,都是固定在 tabbar 上方。目前 nvue 在 App 端,还不支持 --status-bar-height变量,替代方案是在页面 onLoad 时通过 uni.getSystemInfoSync().statusBarHeight 获取状态栏高度,然后通过 style 绑定方式给占位 view 设定高度。下方提供了示例代码代码块快速书写 css 变量的方法是:在 css 中敲 hei,在候选助手中即可看到 3 个 css 变量。(HBuilderX 1.9.6 以上支持)示例 1 - 普通页面使用 css 变量:<template> <!-- HBuilderX 2.6.3+ 新增 page-meta, 详情:https://uniapp.dcloud.io/component/page-meta --> <page-meta> <navigation-bar /> </page-meta> <view> <view class="status_bar"> <!-- 这里是状态栏 --> </view> <view>状态栏下的文字</view> </view> </template> <style> .status_bar { height: var(--status-bar-height); width: 100%; } </style><template> <view> <view class="toTop"> <!-- 这里可以放一个向上箭头,它距离底部tabbar上浮10px--> </view> </view> </template> <style> .toTop { bottom: calc(var(--window-bottom) + 10px); } </style>示例 2 - nvue 页面获取状态栏高度<template> <view class="content"> <view :style="{ height: iStatusBarHeight + 'px'}"></view> </view> </template> <script> export default { data() { return { iStatusBarHeight: 0, }; }, onLoad() { this.iStatusBarHeight = uni.getSystemInfoSync().statusBarHeight; }, }; </script>知识点扫盲下面把相关知识点整理如下: env() 与 constant() 设置安全区域,是css里IOS11新增的属性,webkit的css函数,用于设定安全区域与边界的距离,有4个预定义变量:safe-area-inset-top: 安全区域距离顶部边界的距离safe-area-inset-left: 安全区域距离左边界的距离safe-area-inset-right: 安全区域距离右边界的距离safe-area-inset-bottom: 安全区域距离底部边界的距离获取上安全距离:env(safe-area-inset-top)获取左安全距离:env(safe-area-inset-left)获取右安全距离:env(safe-area-inset-right)获取下安全距离:env(safe-area-inset-bottom)需要的注意一点:H5网页设置 viewport-fit=cover 的时候才会生效,小程序里的 viewport-fit 默认是 cover 。为了更好的理解上文意思,我们来看一下未适配的底部效果:适配后的效果:
-
ubuntu 更改文件夹拥有者和权限 在 Ubuntu18.04 上安装 pyspyder ,遇到权限不够的问题,发现在安装 anaconda3 的时候,文件夹的拥有者是 root 。作为新手只有寻找如何更改文件夹的拥有者,或者修改文件夹的权限。Ubuntu中有两个修改命令可以用到, 「change mode」 & 「change owner」 即 chmod 以及 chown ,其中可以用 递归参数 -R 来实现更改所有子文件和子目录的权限。1、利用chmod修改权限:对Document/目录下的所有子文件与子目录执行相同的权限变更:chmod -R 700 Document/-R 参数是递归,处理目录下的所有文件以及子文件夹700 是变更后的权限表示(只有所有者有读和写以及执行的权限)Document/ 是需要执行的目录常用方法如下:sudo chmod 600 ××× (只有所有者有读和写的权限) sudo chmod 644 ××× (所有者有读和写的权限,组用户只有读的权限) sudo chmod 700 ××× (只有所有者有读和写以及执行的权限) sudo chmod 666 ××× (每个人都有读和写的权限) sudo chmod 777 ××× (每个人都有读和写以及执行的权限)其中 ××× 指文件名(也可以是文件夹名,不过要在 chmod 后加 -ld )。2、利用chown改变所有者:对 Document/ 目录下的所有文件与子目录执行相同的所有者变更,修改所有者为users用户组的username用户chown -R username:users Document/username:users users用户组的username,用户组参数不是必须有。下面这样也是可以的:chown -R username Document/更改目录下所有文件及子目录的拥有组chgrp -R username mydir
-
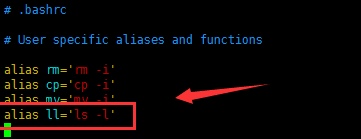
查看目录命令ll command not found 原因ll 并不是linux下一个基本的命令,它实际上是 ls -l 的一个别名。Ubuntu默认不支持命令 ll ,必须用 ls -l ,这样使用起来不是很方便。如果要使用此命令,可以作如下修改:添加别名vi ~/.bashrc若文件存在且包含内容 #alias ll='ls -l' ,则去掉前面注释 # 就可以了。(关闭原来的终端才能使命令生效)这样个人用户可以使用ll命令,当切换成超级用户后,使用ll命令时提示找不到命令,那是因为你只是修改了个人用户的配置,所以,切换成root后做相同的操作即可解决问题。立即生效或者重新登录保存退出文件后执行以下命令使修改生效source ~/.bashrc
-
maven学习<dependencyManagement>正确使用方法 一、介绍 Maven中的dependencyManagement元素提供了一种管理依赖版本号的方式。在dependencyManagement元素中声明所依赖的jar包的版本号等信息,那么所有子项目再次引入此依赖jar包时则无需显式的列出版本号。Maven会沿着父子层级向上寻找拥有dependencyManagement 元素的项目,然后使用它指定的版本号。二、使用步骤创建以父依赖:<?xml version="1.0" encoding="UTF-8"?> <project xmlns="http://maven.apache.org/POM/4.0.0" xmlns:xsi="http://www.w3.org/2001/XMLSchema-instance" xsi:schemaLocation="http://maven.apache.org/POM/4.0.0 http://maven.apache.org/xsd/maven-4.0.0.xsd"> <modelVersion>4.0.0</modelVersion> <groupId>com.yan</groupId> <artifactId>springcloud1</artifactId> <version>1.0-SNAPSHOT</version> <modules> <module>springcloud-api</module> <module>springcloud-provider-dept--8001</module> <module>springcloud-consumer-dept-80</module> <module>springcloud-eureka-7001</module> <module>springcloud-eureka-7002</module> <module>springcolud-eureka-7003</module> <module>springcloud-provider-dept--8002</module> <module>springcloud-provider-dept--8003</module> <module>springcloud-consumer-dept-feign</module> <module>springcloud-provider-dept-hystrix-8002</module> <module>springcloud-consumer-hystrix-dashboard</module> <module>springcloud-zuul-9527</module> <module>springcloud-config-server-3344</module> </modules> <!--打包方式pom--> <packaging>pom</packaging> <properties> <project.build.sourceEncoding>UTF-8</project.build.sourceEncoding> <maven.compiler.source>1.8</maven.compiler.source> <maven.compiler.target>1.8</maven.compiler.target> <junit.version>4.12</junit.version> <lombok.version>1.16.10</lombok.version> <log4j.version>1.2.17</log4j.version> </properties> <!-- 这里进行版本管理,模块需要用到什么需要自己去导--> <dependencyManagement> <dependencies> <!-- 导入springCloud依赖--> <dependency> <groupId>org.springframework.cloud</groupId> <artifactId>spring-cloud-dependencies</artifactId> <version>Greenwich.SR1</version> <type>pom</type> <scope>import</scope> </dependency> <!-- springBoot--> <dependency> <groupId>org.springframework.boot</groupId> <artifactId>spring-boot-dependencies</artifactId> <version>2.1.4.RELEASE</version> <type>pom</type> <scope>import</scope> </dependency> <!-- 连接数据库--> <dependency> <groupId>mysql</groupId> <artifactId>mysql-connector-java</artifactId> <version>5.1.47</version> </dependency> <dependency> <groupId>com.alibaba</groupId> <artifactId>druid</artifactId> <version>1.1.10</version> </dependency> <!-- springBoot mybatis启动器--> <dependency> <groupId>org.mybatis.spring.boot</groupId> <artifactId>mybatis-spring-boot-starter</artifactId> <version>1.3.2</version> </dependency> <!-- 日志测试--> <!-- junit--> <dependency> <groupId>junit</groupId> <artifactId>junit</artifactId> <version>${junit.version}</version> </dependency> <!-- lombok--> <dependency> <groupId>org.projectlombok</groupId> <artifactId>lombok</artifactId> <version>${lombok.version}</version> </dependency> <!-- log4j--> <dependency> <groupId>log4j</groupId> <artifactId>log4j</artifactId> <version>${log4j.version}</version> </dependency> <dependency> <groupId>ch.qos.logback</groupId> <artifactId>logback-core</artifactId> <version>1.2.3</version> </dependency> </dependencies> </dependencyManagement> <build> </build> </project> 这里module就是使用到的子模块,他们都收到父模块的版本控制,但是依赖需要自己去导入,properties里面就是版本的一个控制,然后dependencyManagement里面就可以放我们的父依赖了总结 如果有多个子项目都引用同一样依赖,则可以避免在每个使用的子项目里都声明一个版本号。当想升级或切换到另一个版本时,只需要在顶层父容器里更新,而不需要逐个修改子项目;另外如果某个子项目需要另外的一个版本,只需要声明version即可。dependencyManagement中定义的只是依赖的声明,并不实现引入,因此子项目需要显式的声明需要用的依赖。


您的IP: